Deep Dive – XenDesktop 5 Policies: Part 1 – Access Policy Rules
XenDesktop 5.x provides very flexible and fine grained access policy rules to control resource access to broker desktops or applications. This post covers the basics behind the functionalities and provides a lot of examples for advanced configuration of Access Policy Rules. Advanced rules have to be configured with Powershell, so get your PS console ready!
Background
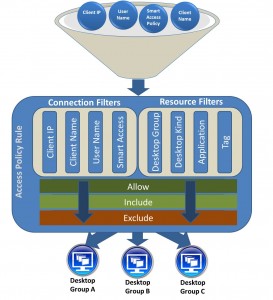
XenDesktop access policies define the rules used to control access of users to Desktop / Application resources in the site. Access checks are based on the attributes of users’ connections from their devices to the XenDesktop site. The access policy comprises a set of rules while each rule contains a set of connection filters, resource filters, and access right grants.
As a general rule keep in mind that if include filters are enabled at least one rule must apply. Exclude filters take precedence even if an include rule matches. Also the users must have an active entitlement to the desktop group.
Connection Filters
Connection filters always have an include and exclude form that can be individually enabled or disabled. By default, include filters are enabled and empty, and exclude filters are disabled. For a rule to be considered when access policies are evaluated, at least one connection include filter must be enabled.
Resource Filters
Resource filters except application filters have an include and exclude form that can be individually enabled or disabled. The application filter has only an include form. By default, include filters are empty and enabled, and exclude filter are disabled. For an access policy rule to expose any resources, it must have at least one include filter that is both enabled and non-empty. Smart Access Filter Tags Each filter tag is a combination of a AG vServer and the applied access policy. Smart Access Filters work with AGEE and AG STD in combination with an Access controller.
Using the GUI within XenDesktop Studio
The GUI is very limited and can only be used to configure basic rules as (any connection / all connections through access gateway / specific connections through access gateway)
**Using Powershell
** Be aware that, after modifying an Access Policy Rule with Powershell, the policy can’t be edited anymore using the GUI.

By default, each Desktop Group gets two Access Policy Rules, when the Desktop Group is created. Let’s say the Desktop Group is named VDI_WIN7, the following Policies will be created automatically: VDI_WIN7_Direct (policy for all direct connections) VDI_WIN7_AG (policy for all connections via Access Gateway) You can either edit these policies or unassign them from the Desktop Group, which I would prefer to have a fall back to the default settings if you crack up the settings via Powershell.
Here are the steps to create and assign two new custom policies to a paricular Desktop Group named VDI_WIN7
1. Display current Access Policies
Get-BrokerAccessPolicyRule | ? {$_.Name -match 'VDI_WIN7'}
2. Unassign current Access Policies
Get-BrokerAccessPolicyRule | ? {$_.Name -match 'VDI_WIN7'} | Set-BrokerAccessPolicyRule -IncludedDesktopGroups @()
3. Create two new access policies, one for direct access and another for AG access, differentiate Access by AD Groups
$dg = Get-BrokerDesktopGroup VDI_WIN7
New-BrokerAccessPolicyRule -Name "LAB VDI User Remote" -IncludedUserFilterEnabled $true -IncludedDesktopGroupFilterEnabled $true –IncludedUsers "MIRULAB\GS-CAG-VDI-User" -IncludedDesktopGroups $dg -AllowedProtocols 'HDX' -AllowedConnections ViaAG
New-BrokerAccessPolicyRule -Name "LAB VDI User Internal" -IncludedUserFilterEnabled $true -IncludedDesktopGroupFilterEnabled $true –IncludedUsers "MIRULAB\GS-VDI-User" -IncludedDesktopGroups $dg -AllowedProtocols 'HDX' -AllowedConnections NotViaAG
Other examples
Modify an existing Access Policy to allow any user to access the “VDI_WIN7” Desktop Group via AGEE as long as he accesses via vServer “cag.domain.com” with applied session policy “session-policy-lab”
New-BrokerAccessPolicyRule -Name "LAB VDI User Remote" -AllowedUsers AnyAuthenticated -IncludedSmartAccessFiltersEnabled $true -IncludedSmartAccessTags "cag.domain.com:session-policy-lab"
Mofify an existing Access Policy to allow a specific user group to access the VDI_WIN7 Desktop Group via direct connection as long as he accesses from Client Subnet “10.2.2.0/24”**
**
Set-BrokerAccessPolicyRule "LAB VDI User" -IncludedUsers "MIRULAB\GS-CAG-Thin-Access" -IncludedClientIPFilterEnabled $true -IncludedClientIPs "10.2.1.0/24"
Add another Desktop Group to an existing Access Policy**
**
$dg = Get-DesktopGroup VDI_XP_Pooled
Set-BrokerAccessPolicyRule "LAB VDI User" –AddIncludedDesktopGroups $dg
Exporting / Importing Access Policy Rules
You can easily export and re-import Access Policy Rules with Powershell which can also save your day by creating a backup before manipulating the objects.
Exporting all Access Policy Rules
Get-BrokerAccessPolicyRule | Export-Clixml C:\Backup\AccessPolicyRules.xml
Importing Access Policy Rules from a previous backup
Get-BrokerAccessPolicyRule | Remove-BrokerAccessPolicyRule
Import-Clixml C:\Backup\AccessPolicyRules.xml | New-BrokerAccessPolicyRule
Complete CMDLET documentation
