Larger enterprises might have more complex requirements controlling network traffic in Azure as well as maintaining the “least privilege” principle. Most of them are using a so called “hub-spoke” architecture, where the hub network is placed within a dedicated “core subscription”. Also other virtual networks are seperated into dedicated subscriptions or just resource groups.
Azure DevOps provides several ways to host your pipelines. While the public AzureDevops service provides hosted and self-hosted agent functionality, Azure DevOps Server (formely TFS), only provides the self-hosted variant.
I personally prefer to work with the public service for the following reasons:
Larger enterprises might have more complex requirements controlling network traffic in Azure as well as maintaining the “least privilege” principle. Most of them are using a so called “hub-spoke” architecture, where the hub network is placed within a dedicated “core subscription”. Also other virtual networks are seperated into dedicated subscriptions or just resource groups.
Using modern Devtools can be challenging if you need to connect through a corporate proxy server. Not all frameworks and tools have a proper support for all proxy scenarios.
People are sharing files using Teams, Sharepoint or OneDrive for Business and that’s ok. That’s one of the collaboration feature these tools where built for. But what if people are sharing files externally, how can you track who is effectively accessing the shared files?
Just coming back from a strange troubleshooting session where an application running on an AKS Cluster was not responding anymore after a network architecture change. It turned out quickly, that the root cause had to be searched in the recent configuration change. The change included a new routing configuration in the customers Azure global network. The AKS cluster’s network has been peered with a new hub network. The hub network is located in SwitzerlandNorth region whereas the AKS application vnet is located in WestEurope. So we have created a so called cross-region or “global” vnet peering.
Recently I received a support request from a customer – backup jobs of Azure VMs where failing. Some of the jobs where still working as expected, while others suddenly where not. The following error message was logged in the job log:
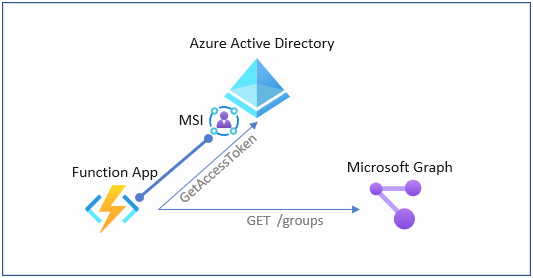
Applications can integrate with the Microsoft Identity platform to allow users to sign in using their work or school account in Azure Active Directory (Azure AD), and to access your organization’s data to deliver rich data-driven experiences. Different permissions allow the application different level of access to your users’ and your organization’s data.
Network Watcher is a regional service that enables you to monitor and diagnose conditions at a network scenario level in, to, and from Azure. Scenario level monitoring enables you to diagnose problems at an end-to-end network level view. Network diagnostic and visualization tools available with Network Watcher help you understand, diagnose, and gain insights to your network in Azure. Network Watcher is enabled through the creation of a Network Watcher resource. This resource allows you to utilize Network Watcher capabilities.
Azure Firewall is a fully managed, stateful layer 7 firewall. In contrary to classic NVA based concepts, there is no need to care about scale and throughput because all of this is managed by Azure in the background. I always recommend it to customers, unless there are specific killer reasons to still use NVA based firewalls. As you might know, deploying highly available NVA solutions hurts big time, because you need load balancers on both, the internal and external NVA interface.
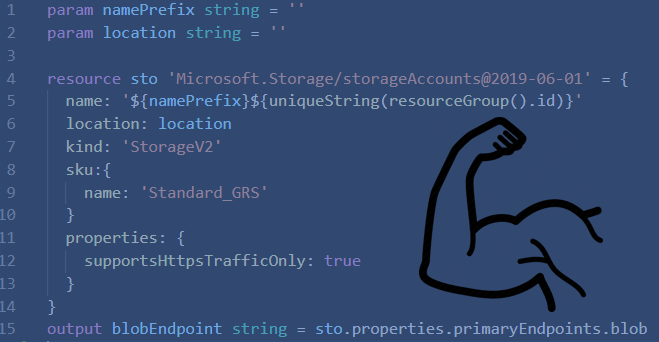
I’ve been using terraform for Azure IaC in various customer projects the last months. One thing which is really critical is to have a proper terraform backend configuration. As long as you’re the only one working with a specific terraform configuration you only have to care about your own state file. But for production environments, where deployments are usually triggered by a CI/CD pipeline, you’re no longer handling with local state files and have to store them on a cloud storage. For Azure, it’s obviously an Azure Storage Account where you put your state file inside a blob container.
Azure Policy is a comprehensive tool to control and govern your azure environments. Whether you want to audit or prevent things from happening in your azure subscriptions, there are plenty of built-in policies you can customize according to your needs. Now I often get the question when and where policies get evaluated once created.
Getting up early this morning was worth it. As per 1st of July all Microsoft MVPs are curious if they contributed enough to the community to become re-awarded for another year, I got THIS! 🙂 . Awarded for the 6th time in a row, I’m really honored and proud to be a part of an exclusive group of smart people from all over the world. Being in close contact with the Microsoft product groups also helps me in my day to day life. Also the annual MVP Summit conference provides a unique opportunity to meet my MVP fellows and the people from the PGs in person and discuss the latest and greatest and to handover feedback.
Azure Automation is a robust, cross platform and powerful automation engine for script based process-automation. If you are unfamiliar with Azure Automation, have a look at the official docs here.
Azure Pipelines is a part of Azure DevOps service portfolio. Azure Pipelines help you to build,configure and run your CI/CD (continuous integration / continuous delivery) processes for application development and infrastructure as code.
In a previous post I covered Azure Storage DLM (policy based data lifecycle management) to leverage automatic storage tiering and archival. In this post I’m going to show how immutable compliant WORM storage can be enabled and used on Azure Blob Storage.
Windows Defender Application Guard (Application Guard) was introduced with Windows 10 build 1709 and is designed to protect from current and future attacks against internet exposed applications such as Edge or Office applications. WDAG leverages Microsoft virtualization and hardware isolation technology, in fact Hyper-V containers to isolate applications from the operating system. Hyper-V containers seem to be an ideal solution for this as the have a more secure virtualization abstraction layer than classic container.
After we had the possibility to pre-test the UR3 early bits, it has now been officially released. Update Rollup 3 for System Center Virtual Machine Manager 2016 includes several fixes and enhancements.
Extending Cluster Shared Volumes is a common task which is required from time to time. Although my favorite action is to create a new volume if existing ones lack in free space, sometimes there’s no way around extending an existing volume. I’m really happy Microsoft did listen on our feedback we provided on Storage Replica, in the early stages of Server 2016 TP version, where we yelled for the feature (online-extending a replicated volume).
A “Hybrid Runbook Worker” is basically an extension the the MMA (Microsoft Management Agent), meant to execute Azure Automation Runbooks on premises. For a general introduction I’m referring to the following documentation:
At some point in time every SDN deployment hits it’s scale limit. In Microsofts SDNv1, a single NVGRE gateway can serve up to 100 tenant virtual networks and 200-300Mbit/s throughput. To scale out the network virtualization deployment, additional gateways or gateway clusters have to be deployed. But how can we migrate existing virtualized tenant VM networks from one gateway to another?
Nano Server is a new deployment option for Server 2016 where you need to create the images prior the deployment. If you’re unfamiliar with Nano Server I highly recommend the following “getting started” documentation.
In this article I’m going through the steps required to build up a S2D hyper-converged cluster using virtual machines. S2D BTW stands for “Storage Spaces Direct”, which is has been introduced with Server 2016.
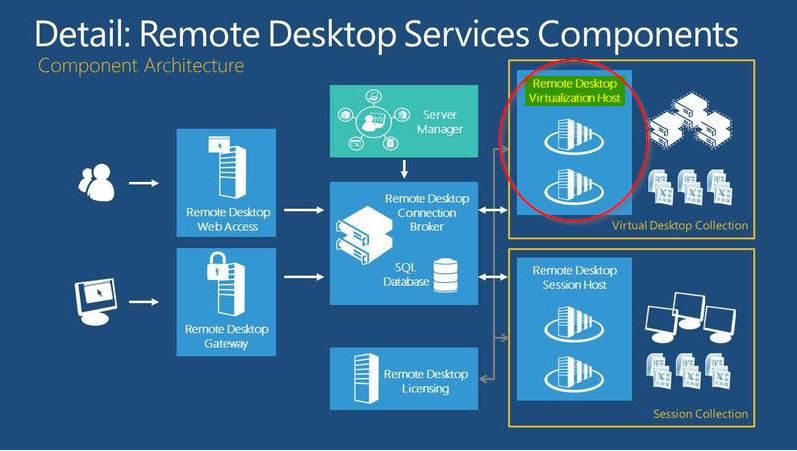
The time will come, where you have to “re-home” your RDS VDI collections, respectively the master images and the deployed desktop instances to a new storage location. In this post I’ll guide through the steps which worked for me. As they involve direct modifications to the RDS Database, this is probably not officially supported and you’ll do it on your own risk!
In an earlier post I showed how-to-deal-with-variable-scoping inside PowerShell Workflows to be usable within InlineScript blocks. While the $USING way is simple and easy it conflicts with proper error handling inside InlineScripts.
Since December 24th, Azure Automation supports RBAC. We really asked Microsoft to implement this enhancement, as lots of sensitive information and code may live within an Azure Automation account. Assets are used to store credentials, variables, connection objects. As you might have more and more contributors to the system, you probably don’t want to share all your credential objects to anyone writing automation runbooks. Before RBAC, the only way was to create multiple Automation accounts, but of course this introduced other difficulties.
While preparing my Demo Environment for the next TechNet Event, in fact re-bulding it with Technical Preview 4, I stumbled over an error while configuring the Cloud Witness for the storage clusters. Cloud Witness is a new feature of Server 2016. To have a Quorum for your clusters you can now leverage a file share resource on your Azure Storage Account. See here for more information about Cloud Witness.
As last year, November 2015 will be a very busy month. Beside lot of customer projects all around private- and hybrid Cloud deployments, first stop on my road trip is Seattle. During the week of 1st to 06th of October I’m honored to join the annual MVP Summit in Redmond.
If you use Logical Network / Logical Switch capabilities in SCVMM, and you hopefully do so ;-), then you might want to change virtual port profile / uplink port profile settings from time to time. Changes to the following properties can be made on the fly:
Microsoft based VDI deployments require to install a specific Windows Feature called “RDS-Virtualization” onto all Hyper-V hosts being part of a RDS VDI Deployment.
With Windows Server 2016, Microsoft is once again going to mix up the storage vendor market. Continuing the ASD (all Software defined) strategy, some new cool features arise with the new version. If you’re familiar with Storage Spaces / JBOD architectures already you might now, that there are some limitations today, which may prevent some customers adapting this technology. The current version does not allow:
This is a “lessons learned” post and a follow up to an earlier post on “SCVMM in multi-forest environments” to keep others away from “trial and error” when integrating SCVMM with Hyper-V in a secured environment. So what does “secured” and “locked down” mean in this context? Let me first describe the environment and use case a bit. The options to change the architecture below where limited due to customer’s internal security regulations.
After recently updating a customer’s HP Blade environment to the current firmware release, Hyper-V baremetal deployment stopped working. The environment is managed via HP OneView. HP OneView is a linux based, virtual appliance for central management of HP components, such as servers, blade chassis, interconnect flex modules, etc. An important thing to know is that fact that the servers will get an additonal, virtual SMBIOSGUID, as soon as they get under control of HP OneView. And these are the issues I had, after the FW upgrade thru OneView.
Storage Spaces allows you to define default values on a Storage Pool, so every new created virtual disk (space) is using those values, even if the administrator does not provide them or doesn’t know how to provide them. A common issue arises when fabric administrators are using one of the GUI options to create spaces, either the Server Manager or SCVMM. Why?
Job concurrency can be something you really want, or on the other hand something you really want to avoid. What if you want to enforce a particular runbook to have only a single job instance running at any given time? Unfortunately, SMA doesn’t have a built-in method to control runbook concurrency as Orchestrator 2012 / R2 had it on a per runbook base. My fellow co-worker Fulvio Ferrarini reached out if there’s a known work around and referred to the following discussions:
As SMA is almost anywhere around in my daily job, I’m also faced with usual and unusual troubles of course. Especially the authentication part can be a tricky one. Therefore I decided to dedicate the 3rd and last episode of the “Troubleshooting SMA” series to the “Authentication” topic.
In this post I’m focusing on several considerations regarding authentication within SMA Runbooks. After a relatively dry theory block, I’ll pick up some scenarios from the field.
As I work more and more with SMA in my daily job, I’m of course also running into situations where things go wrong. I decided to share some troubleshooting tips and therefore, this is the first post in a series of 3, explaing how to troubleshoot SMA infrastructure, failing jobs, stuck / stalled jobs, etc.
The process for creating a new clustered space includes a fair amount of single steps to be processed in the right order, no matter if you use the Server Manager GUI or PowerShell.
Some weeks ago Microsoft released Update Rollup 3 for System Center 2012 R2. Part of this RU, SCVMM components also got updated. This time, unfortunately it was not sufficient to update the SCVMM Server / Console components and to execute the post-update SQL script. Microsoft has also updated the SCVMM DHCP Agent extension running on all managed Hyper-V hosts. The KB article states to manually check for a recent version and update it.
One of the things I like with Powershell is the way you can handle object output and format conversations in a very easy and efficient way. In this example I’m going to show a Powershell script to generate a HTML report on the current Windows Storage Spaces Status. Although you can monitor the most relevant eventlogs like Cluster and Storage Spaces driver, it’s useful to have a single script, which generates a brief overview about the Windows Storage Space status and it’s configuration.
System Center Universe opens its doors for the second time in Europe. From September 17-19, 2014, Basel (CH), the community event is going to deliver best of class technical sessions and networking opportunities. SCU Europe will host the crème-de-la-crème of the Windows Server and System Center Community from all over the world including 27 MVPs as well as some Microsoft employees and program managers.
In February 2014 I released a Service Management Automation white paper on TechNet. It became quite popular, so I decided to make this an ongoing project. I decided to release an update to the document at least 3 times a year. So my next editor round came along a request from Aleksandar Nikolic, the co-founder and editor of the famous Powershell Magazine. He also invested a fair amount of time to review my SMA white paper. A lot of useful and interesting comments where the result and along with other additions from myself, i’ve put all together into a version 1.04. The most recent version is available by now on TechNet Gallery.
Yesterday was an exciting day as I received the confirmation email from Microsoft for my first MVP Award. I’m proud now being part of this worldwide experts community. I was awarded with MVP for Cloud and Datacenter Management, which is a group of ~80 experts around the world. This not only shows that Microsoft is recognizing my work for the community over the last years, it also shows that these efforts together with the support of my fellow geeks, friends and co-workers have pushed me a huge step forward. I’m really looking forward to the MVP Global Summit, kicking of in Redmond this November. I’ll meet a lot of fellow MVPs and Program Managers in person. Lots of them I’m knowing “only” from Twitter or Email. This award motivates me to continue working with and for the community, to share knowledge and experience, and to inspire more people building Microsoft based clouds.
In this post I’m not going through the topic why you should use a software defined network architecture (SDN), there are plenty of posts out there explaining why THIS is the way to go. Instead I’ll explain how the teaming works in Server 2012 R2 and how it can hurt you while pushing a logical switch from SCVMM to your Hyper-V Cluster Nodes.
Although Service Management Automation is IMHO the future of automation and orchestration, it has some downsides compared to the graphical editor capabilities of System Center Orchestrator. I assume that the next version of SMA, will address at least some of the missing features. In the meantime the community starts developing own solutions to make SMA runbook management a bit easier, especially when dealing with lot of runbooks and workflow code.
Some times things go wrong and sh** hits the fan. But in my case I was pretty sure I’m doing everything correctly when installing a HA SCVMM Cluster. So almost at the end of the SCVMM Server setup process, the setup engine throw an exception and performed a full rollback.
Automating the world of datacenters and infrastructures has always been one of my passions. Starting with Service Management Automation (SMA), the capabilities have been extended in very cool ways. While still, SC Orchestrator is used heavily to automate IT processes, SMA is IMHO the little twinkle star. Released as a Version 1.0 together with Windows Azure Pack last year, the way Microsoft goes with automation in SMA has significantly changed the game. SMA is purely based on PowerShell Workflows. This brings some great enhancements like direct interoperability with DSC (Desired State Configuraton). PowerShell Workflows are rock solid, do support checkpoints and can be re-used even outside of SMA. Of course there are also some things you might miss in the current version of SMA when you compare it to SC Orchestrator.
One of the awesome capabilities in Service Management Automation I like very much, is the ability to link SMA Runbooks with VM Cloud action events. Action events are triggered when SPF executes actions against Windows Azure or System Center Virtual Machine Manager. There are a lot of actions you can choose to trigger and fire up a particular SMA Runbook. Refer to this link for a complete list of action events and their related objects.
Currently I’m working alot on SMA (Service Management Automation) and the transitions from SC Orchestrator. One big advantage SC Orchestrator still has, is the visualization, especially when following the best practice. Runbooks should not contain too many activities and should be generalized wherever possible. This keeps the Runbooks clean and reusable. So how can you nest Runbooks in SMA?
Generally this is explained in my SMA Whitepaper on the TechNet Gallery.
In this post I’m going to show how Powershell Desired State Configuration and Service Management Automation can be combined to ensure, all SMA Runbook Workers have the same configuration and set of additional Modules and SW packages installed.
A lot of people are still using VLAN based isolation for their Software defined Network in System Center Virtual Machine Manager. Although you have 4096 VLanIDs to assign, sometimes things have to be changed. Did you ever try to change a Subnet or VLANId on a Logical Network Site that is in use?
At the moment I’m working a lot with SMA (Service Management Automation) in Windows Azure Pack. You you’re unfamiliar with this topic, I’d recommend to read my white paper about SMA.
Some days ago I published a whitepaper about Service Management Automation (SMA) using Windows Azure Pack. It covers a basic guide through setup and operating SMA inside your private/hybrid cloud environment. You can get the Whitepaper here on TechNet.
In a recent blog post I wrote about the importance of Windows Azure Pack and Service Management Automation and why I think, Windows Azure Pack isn’t just for Service Providers. I’m glad to release a whitepaper today, giving guidlines to deploy and manage SMA.
After recently patching all 2012 R2 Hyper-V Cluster Nodes in our own datacenter, I noticed randomly BSODs. After a short investigation I was able to narrow it down a little bit. As soon VMM started to rebalance the VMs, one after each node went into BSOD. It seemed that the first live migration task succeeded, while subsequent tasks failed. As soon the second LM process started, the target host died. So WTF… was going on here.
In one of my recent posts, I showed how to extend a CSV using Powershell and DISKPART. As I’m constantly trying to avoid using “legacy” command line tools, I decided to find a way around DISKPART.Therefore I was able to create a Powershell Function to extend a CSV on a Windows Failover Cluster.
Windows Azure Pack (codename “KATAL”) has been released together with the R2 wave of the Server and System Center platform. Windows Azure Pack, I’ll call it WAP in this post brings Azure style self-service and automation to your private cloud.
Enabling Hyper-V Replica is usually a no-brainer. But what if it fails to establish a replication? Weird error messages and corresponding weird event log entries don’t help to debug most of times. In this blog post I’m going to go through the basics of Hyper-V Replica and the most common configuration issues which can prevent a successful replication initialization.
Back in the days, my first E2EVC (formerly called PubForum) in 2005 was already a great event having smart people discussing technical related stuff around server based computing. The attendee count was around 30 while nowadays, we have around 120 attendees on each event, which kicks off twice a year. This time we met in Rome (Italy) and, we’ve had attendees from 18 countries, including 18 MVPs, 15 CTPs and 6 vExperts. This has been the 20th event since the initial launch 10 years ago.
In this post I wanted to give a short wrap up about my experiences upgrading existing Hyper-V 2012 Clusters and VMM 2012 SP1 to the new R2 version. I decided to leave out all print screens to keep the post short and useful as a guidline.
SCVMM does provide ten default custom properties (CustomProperty1-10). Like the custom properties of an AD object, objects in VMM can be enriched with information by adding data to those properties. Now there’s even more. You can define additional custom properties at will. So thinking about possible use cases I came along the following…
It’s common to create and dispose / delete lots of virtual machine in an automated private cloud. SCVMM comes with it’s own implementation of a tiny DHCP-Server like service. The feature allows the assignment of IP addresses from a pool to deployed virtual machines. SCVMM tracks the assignments by adding them as “AllocatedIPAddress” object types. SCVMM R2 together with Server 2012 R2 will allow an integrated IP address management using IPAM extensions for SCVMM. For now we have to manage it ourselves.
In this article I’m going to highlight some of the most common multi-forest scenarios you may have to deal with operating a System Center Virtual Machine Manager. The official Technet documentation claims that multi-forests scenarios are supported using Kerberos. Unfortunately I did not find an official deep dive on that yet.
Deleting a Logical Network within VMM can be painful if it’s already configured end-to-end, meaning all components plugged together and Hyper-V Hosts equipped with a Logical Switch accordingly. If you’re not an expert on how the different components are plumbed together, you’ll probably waste a lot of time digging the various dependencies. To save also time for my own while playing in LAB and Demo environments I created a little Powershell script that does all the work for me. It performs the following steps.
Storage Spaces is a technology Microsoft introduced with Server 2012. It allows creation of high performing, redundant and flexible storage architectures using common hard disks (JBOD).
When I first thought about joining TechEd Europe this year, I did not had a lot of expectations regarding new products and features showing up. Fortunately I’ve been corrected and completely flushed with amazing, incredible new stuff coming up with R2 versions of Server 2012 and System Center 2012.
Server 2012 RDS has been a huge game changer for shared hosted desktops as well as for hosted VDI deployments. The capabilities you get out of the box fit the requirements of a lot companies I’d say, and when I say a lot I don’t mean all. There are still uses cases where Citrix has to be in place and I feel that being still a good point because it keeps the innovation cycle up and running.
In one of my recent posts I covered an issue with Microsoft UE-V regarding open applications at logoff. To keep it short here, application settings of opened applications are not synced back to the central location store when logging off. This behaviour is by design in the current UE-V release and might change in a future version.
I came along a weird issue when trying to automate a SCVMM Hyper-V Bare metal Deployment using System Center Orchestrator 2012 SP1. As the System Center Integration Pack for SCVMM is focused on virtual machine automation tasks, I had to create my own Powershell scripts.
A lot of customers I’m currently engaged in Hyper-V Projects have started their Hyper-V 2012 deployments without SCVMM. As they are trying to integrated it actually one of the most popular questions arising is:
I recently came along some issues while trying to import previously exported or copied virtual machines for a customer. The recent admin did not document what he tried to do so far, but several of the virtual machines where in a likely “inconsistent” state. Importing those VMs using the Hyper-V Manager GUI or Powershell CMDLETS failed with different errors, but all pointed to the same root causes.
Hyper-V with Server 2012 and SCVMM 2012 SP1 offer great network management and virtualization features. Even if the MS Technet documentation covering this is not bad at all, you might struggle trying to configure a converged fabric or network virtualization. This blog post just provides useful links to other blogs from fellow geeks and SMEs which will help you a lot to understand and configure virtual networks and switches. Personally I prefer the software defined networking approach using SCVMM, as it also shows the power of centralized definition and configuration.
I got the confirmation that I will present again @ E2EVC in Copenhagen, this time together with MVP Thomas Maurer about System Center Virtual Machine Manager 2012 SP1 .
This might be very useful for certain situations where you want to update a user’s or computer’s group membership without the need to re-logon / restart. The whole magic is behind the issued kerberos tickets after you logged on to a machine or a machine has been started. The tool “klist.exe” cannot only be used for troubleshooting to display the current issued TGT / TGS, it is also capable to purge all current tickets. The purge command results in a re-issuance of the tickets, as soon as the next auth or service request is taking place. Keep in mind that this method only works for services which authenticate via Kerberos. NTLM based authentication still requires a fresh logon with updated group membership token.
Even this happens very rarely on a Hyper-V host 😉 , it might still be useful under some circumstances to kill a hung or stucked VM. Most of the times the hung situation is caused by a guest shutdown request which does not get completed successfully. The GUI doesn’t provide you a solution here (neither SCVMM, Hyper-V Manager or Failover Cluster Manager). Good old Powershell will solve it for you.
Using Appsense Environment Manager to copy files at computer startup trigger can lead to headaches, because the action is executed by default without respect to the network connection / domain connection status. Therefore I created an intelligent Powershell script which can be used as a reusable condition prior to the copy jobs.
Microsoft UEV could be called as “just another profile management solution”. I agree it’s a bit late for MS to publish the solution as there are vendors like Appsense or RES, which focus on user virtualization and user workspace management since many years with success. In the meantime UEV can be a value add for customers which think traditional roaming profile just suck, but don’t want/can spend a fortune for a high end solution… and… It’s included in MDOP 2012. For an overview about UEV I’d like to refer to a geek mate of mine, Helge Klein. Find his article here.
As I first noticed this behavior in March 2012 I didn’t expect to have a support case with Citrix, Microsoft and Appsense for about 6 months duration. The behavior affects services and applications implemented as network credential providers on a XenApp host. Usually they get launched by MPNotify which is spawned by Winlogon upon a correct and regognized logon method. But MPNotify was never kicked off when using Kerberos or Kerberos Pass-through logon method on XenApp servers. So in my case this affected the Appsense Environment Manager on the XenApp hosts, because the agent runs under LOCALSYSTEM and uses a credential provider for impersonation. So long story in short words.. Appsense EM was off the game when using Kerberos logon method on XA session hosts.
As I read these bad news I thought about like many other geeks, how to find the right words for a tribute to Laura. I can’t say better than Chris Marks, that Laura’s contribution and her spirit inspired me to be a Citrix geek even in hard times when Citrix product versions 1.0 sucked. She is one of a few persons in the world, which you can’t easily replace with just another. I’m not sure who lost more by this move, the community or Citrix. At the end both will miss the charming, geeky girl pushing the community to be the most active and respected in the vendor’s world.We will miss her so much and I hope that wherever she moves to, we’ll be able to enjoy her charisma again.
XenDesktop 5.x provides very flexible and fine grained access policy rules to control resource access to broker desktops or applications. This post covers the basics behind the functionalities and provides a lot of examples for advanced configuration of Access Policy Rules. Advanced rules have to be configured with Powershell, so get your PS console ready!
Assuming that you followed Appsense best practice for Office personalization Settings, you might still have an issue with Office (Outlook) when using the “send via email” function out of 3rd party applications like (Acrobat Reader, IE, etc.)
As the issue described in the previous post might also affect XenDesktop 5 deployments with vSphere I decided to create a script for XD 5.x too and post it to the community.
Due to an administrative action, restore or rebuild of the vCenter database, assignments between the hypervisor connection from DDC’s pool management service and the vSphere vCenter might be lost. The XenDesktop PoolManagementService manages the assignment by adding a special annotation attribute to each VM which has been added to a pool. The attribute name is CTXGuestOSId where the value represents the SID of the VM’s AD computer account.
Somebody has stolen an IP address which belongs to one of your vSphere guests and you have an IP conflict reported in Windows Event Log? Just note the suspicious MAC and execute the following statement within vSphere PowerCLI
This post describes how to use the Netscaler responder feature to redirect users to a different Web Interface Site on the same web server if they are connected via VPN (AG plugin).
This week i decided to take myself into a Hyper-V installation running on a Server 2008 R2 SP1 Core. To share my experience and to conserve my own knowledge I’d like to share my personal experiences in this blog post.
I’m sure almost everyone dealing with upgrading an existing Exchange Org to MS Exchange 2010 wondered about the name of the administrative group created automatically under the configuration container.
Leaving the “Default” user profile as it is can hurt your VDI / RDS deployment, because Windows needs certain amount of time to create a new user profile from the initial default one. The Default has not been initialized, meaning e.g. the HKCU hive is not generated, active setup has not initialized components.
Attending the vSphere 5 upgrade class gave me a pretty good overview of vSphere 5’s new features and enhanced functionalities. VMware has again made a step forward to provide a – please forgive me – “Cloud proven” virtualization solution.
I tried multiple solutions to remove these annoying links in the windows explorer shell (win7 / 2008 R2), but none worked perfectly. But thanks to Appsense EM it’s pretty easy to get rid of these useless things.
Powershell provides easy replace and split method to manipulate text/string values. They are easy to use but…if you want to replace content only on subsequent positions or split a string using a pattern containing more than a single character, you’ll fail.
This is a Powershell snippet to add a smtp proxy address to an existing mailbox in a Exchange 2010 environment.
It must run on a machine with installed Exchange 2010 Management Shell.
If a XenClient VM which is registered to a synchronizer couln’t contact the synchronizer for a while it will be marked as “locked” on the XenClient. The default lease time for “offline” VMs is 14 days.
If you have hundreds or thousands of VMs you could run into a problem if someone wants to now the correspondig VM to the MAC address XYZ. Because the network administrator isn’t a big help finding virtual adapters on his physical network infrastructure, the hypervisor is the choice to search for the apropriate virtual NIC. If you have a plenty of VMs you would probably going crazy clicking through each VM’s NIC properties.
Once upon a time there was a cool wrapper dll for accessing TS session info from scripts and .NET programs without accessing the complex and poorly documented WTS API. The dll was called WTSadmin.dll. Unfortunately this assembly does not work any more on 2008 R2 RDS. Googling and binging sent me to a project named Cassia, which is in fact another wrapper for the WTS API. And theeeeeere.. is a Powershell module using the Cassia wrapper. It can be downloaded here.
If you want to unregister all VMs on a particular vSphere Cluster / Host you’re pretty done using the GUI, registering all VMs on a datastore could take you to the “hell of clicking masters” depending on the amount of VMs to register. I created two powershell functions which do that stuff for you.
Pubforum is no more, it’s now called E2E virtualization conference. The most of us think that it’s a good change to gain a more professional touch also for the sponsors by this rebranding.
After a lot of unsuccessful tries (even with Appsense Personalization Manager it’s hard to save and restore user certificates, if AppData is not redirected), I found a valuable way to export and import user certificates at Logoff / Logon.
This article describes all steps to activate certificate based authentication to Outlook Web Application on Exchange 2010 / IIS 7.We assume here that you already have configured the SSL server certificate for the CAS server and the user accessing OWA has a valid user certificate for authentication installed.
Microsoft has recently published an article here which covers the required steps to integrate Blackberry Enterprise Service in a Exchange 2010 environment.
Update!: Regardless of the fact that the method described below still works for Windows 2012 incl. Domain Controllers, it is not a supported way and you use it at your own risk.
Trying to install Exchange 2010 SP1 on 2008 R2 was not that easy as I thought. Everything but the CAS role could be installed.
After installing latest windows patches setup asked always for two additional hotfixes while checking prerequisites for CAS role. Google and MS KB showed up weird results..
XenDesktop 5 has a powerful powershell interface which can much more for you than the 4.0 SDK could.
But……
Due to the fact that some configurations can’t be made anymore using the Desktop Studio GUI your only way is to get familar with Powershell.
The traditional Windows BSOD has turned into a rarely occuring phenomen, sometimes you might see still see it. Didn’t you crossed your hands over your head and thought… What the f*** shall I do with this information on the bluescreen?
I’ve collected some useful links which will help you to get a knowledge of analyzing crash dumps (system and application crashes). Finally it shows you which component was responsible to crash your system / application.
An important note here:
MOST of user executed applications can’t be responsible for a system crash cause they are executed in the user mode of the operating system memory. So mainly kernel mode sw/hw drivers are causing your winbox to show a BSOD. Instead of asking your users, “which application did you start before it crashed?” you better have a look into the following pages and make yourself fit in basics of crash dump analysis. A special thank here to Mark Russinovich, Dmitri Vostokov and Lalit Kaushal for sharing their tremendous knowledge about this stuff.
The following link provides a collection of debugging tools used in Citrix XenApp environments.
Very useful overview, some of the tools are quiet oldschool but still provide a value add
Some known and also a lot uf unknown faces I see here at PubForum. Because of Synergy we’ll have a lot of Cirix people onsite, which will be a value add to the community I think.
After a short keynote from Alex Jushin the sessions start with the session of Markus Klein and Oliver Lomberg from Citrix Systems
The lates news from Synergy are brought to the commubnity.
Designing and deploying a virtual desktop environment can be a pai* in the a** if you do not watch carefully the most common keypoints, errors and misunderstandings.
Many people are asking: “how in the world they know that’s me returning to their website?” Well.. the most known reason is that the website stores a cookie on your local harddrive.
The following doc outlines in detail the esxtop output. A must for everyone before using esxtop on your host to discover bottlenecks and performance issues.
After having esx 3.x deployed, we noticed quiet fast that network based storage can’t be multipathed and load-balanced really. There are a small number of tricks using LACP, channeling.. but… This does not help at all. The following article describes in detail, why VI 3.x can’t load balance the IP based storage traffic.
Starwind Software offers a free tool to convert virtual disk files from vmdk to vhd format and vice versa. This is especially useful if using Provisioning Server and there is the need to update PVS Agent or Hypervisor Tools inside the guest (such as vmware tools). Just convert to vmdk, boot and update your stuff, then convert back to vhd… done!
A run in a very special issue when I tried to pass arguments to a powershell script if one of the arguments contained single quotes within the argument string like “this is damn ‘quote’ inside the arg!!” Your powershell script would then think that these are separated arguments. You won’t get the hell out of this sh*t. One possible solution is to place the “wracky” argument at the end, in fact use is as last argument. Install the Powershell Community Extensions and use the join-string cmdlet. Here’s an example.
The following code enables a file based locking mechanism within a powershell script. It checks for existance of a lock file and checks if a running process exists, which is capturing this file. This can be used in situations, where a script is beeing launched paralell by another script or programm, but you want to have your script executed exclusively and serialized.
Microsoft has launched it’s new PC security solution “Security Essentials”, an all in one client protection suite, all free and after a first look at it – really not too bad. It protects from virues and malware.
Because there are a lot of useful docs, links and other useful information about MS AppV (formerly SoftGrid), I tried to help myself and others to keep this stuff a bit together for future use.
In SQL Server 2005 and later Triggers can be more than simple T-SQL statements. You can include complete procedures and program code.
This post describes how to create a “Common Language Runtime” Trigger on a SQL Database which fires on INSERTS into a specific table.
A CLR Trigger is a kind of stored procedure including .net compiled program code.